Sun setting on the Port Kelsey
Figuratively and literally….
looking for the Weathering a Steam Engine post? Click here….
Weathering a Steam Engine post
Click on image for a larger view….
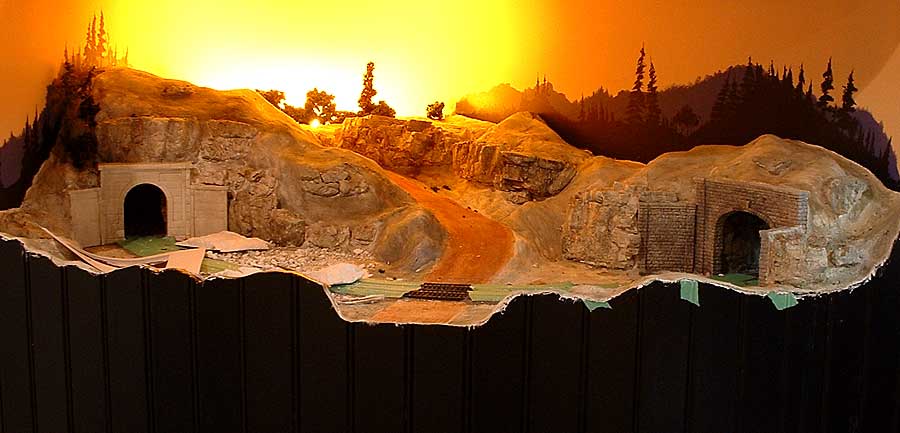
Image Copyright (c) 2006 Tim Warris
Partially completed scene on the Port Kelsey
Since it looks like the layout may have to be dismantled in the coming year I have been hesitant to do any work on it, which is quite frustrating seeing that it has taken me 6 years to get it to this point, where the fun stuff starts. Building the benchwork, backdrops, roadbed, trackwork and endless wiring, I finally got to the part that I have long been waiting for, only to have to face the weighty decision of tearing it all out. It is reduced to a simple decision of keeping the layout and continuing on with its construction, or continuing on with Fast Tracks.
Fast Tracks won.
I figured that the ultimate destination of every model railroad ever built is a big dumpster, the only difference between what I am doing and what I had planned on doing, is the length of time before it hits the dumpster. I might as well keep working on it, at least I can enjoy the process while it lasts, and get a few pictures out of it.
So with this in mind, I spent some of the last few days working on a section of the layout I have been looking forward to completing.
When I painted the backdrops a couple years back, I did a section with a couple shades of orange for a future sunset scene. I wasn’t sure what that scene would be, it varied from time to time from a golf course, to a high trestle, to a bar (not a model bar, a real one, the kind with bottles and stuff), to this final generic scene.
I took a few pictures along the way and have documented the process here….
This scene is my first attempt at doing this type of scenery, the kind with rocks and trees and stuff. Usually my scenery is much more urban. Even though it isn’t done yet, I am finding it very enjoyable.
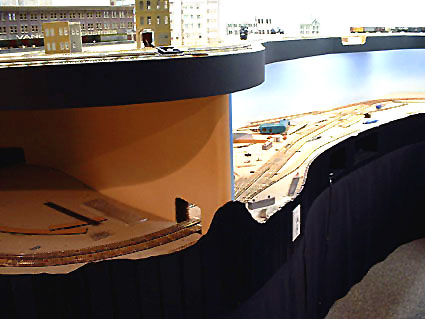
Image Copyright (c) 2006 Tim Warris
I forgot to take a “before” shot of this section of the layout and this is the only one I could find, the area on the left is the section I am working on now.
Before the image below was taken, I painted and ballasted the track in this section and masked it off.
Click on image for a larger view….

Image Copyright (c) 2006 Tim Warris
I started by constructing the tunnel lining. I wanted the inside of the tunnel to look like it was blasted from solid rock, so I made several rock castings to use for the lining. I lined them along the track behind the Woodland Scenics tunnel portal, and covered the entire thing with plaster cloth to close it all in. That plaster cloth is great stuff! All you need to do it dip it in water and lay it in place, no racing the hardening of plaster while you dip paper towels into it.
I sprayed the backdrop with black paint to make sure no bright orange spots would show up deep in the tunnel.
Click on image for a larger view….
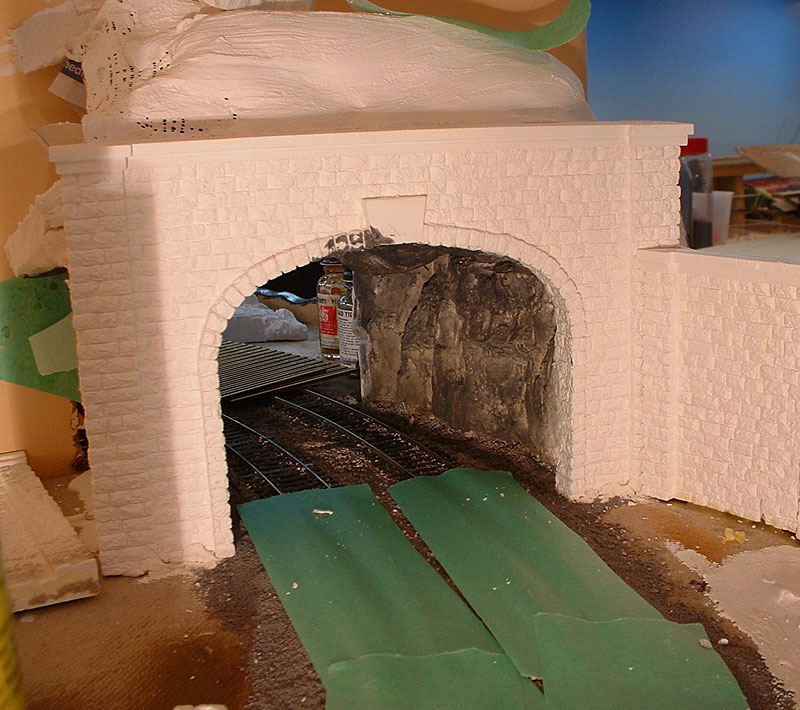
Image Copyright (c) 2006 Tim Warris
Click on image for a larger view….

Image Copyright (c) 2006 Tim Warris
I like this look, gives the tunnel a “creepy” look to it. It looks good, but almost impossible to take a picture of it, so you will have to drop by to see it at the next doubleheaders tour.
Click on image for a larger view….
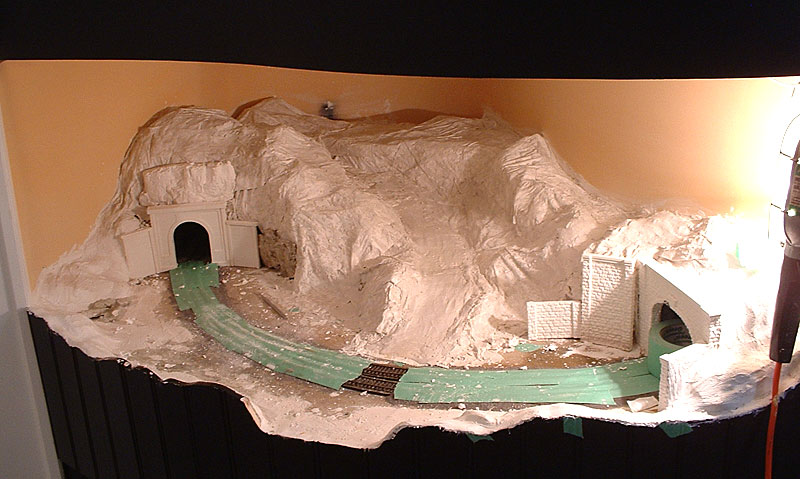
Image Copyright (c) 2006 Tim Warris
Again, I didn’t take any pictures of the next step, I was having too much fun and forgot to snap a few shots.
I wanted to have a road crossing here, and decided to have it wind its way up the side of the hill and curve out of site. It took me a while to figure out how best to form the shell of the scenery. In the end I used balled up newspaper and airbags stolen from the shipping department. These bags work great to fill up large areas.
Since I ran out of the plaster cloth, and it was a Sunday, I used paper towels dipped in Plaster of Paris to create the hardshell shown above. This is a very gooey, yet somehow intriguing step.
Click on image for a larger view….

Image Copyright (c) 2006 Tim Warris
Using some Hydrocal and Woodland scenics rock moulds, I made up a bunch of rock castings. Hydrocal works better than plaster for rocks as it seems to dry faster. Plaster, like Hydrocal, hardens in a couple minutes, but plaster takes a couple of days to fully dry up, where Hydrocal dries in a day or so. To get good colouring on the rocks it works best if it is throughly dry.
Normally the rocks aren’t coloured until in place, but I was playing a bit with some Woodland Scenics rock stains, which work great! The trick with these is to really dilute them, about 20:1 with water, and apply a light wash onto the rocks after pre-wetting them with a spray bottle filled with water. Several layers can be added to create a nice depth.
Click on image for a larger view….
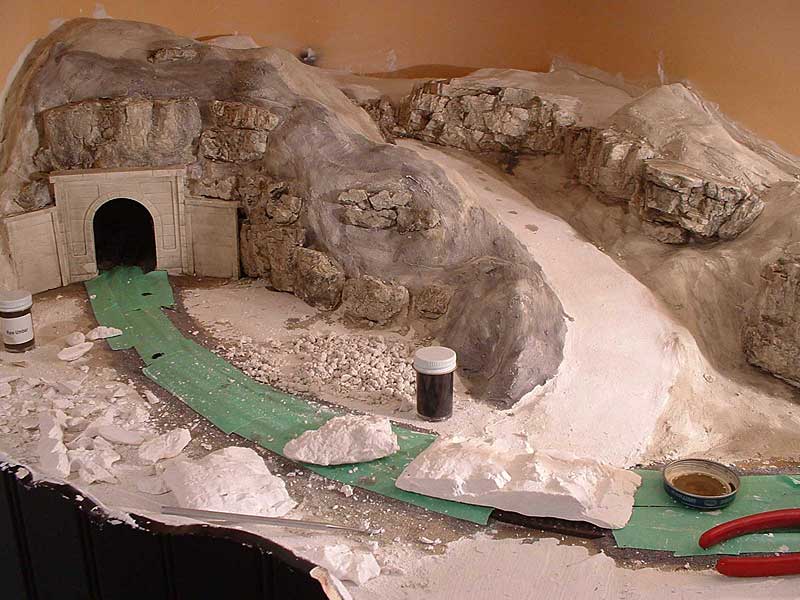
Image Copyright (c) 2006 Tim Warris
I applied a wash of color to the entire surface, including the rocks. The tunnel portals are also stained.
Click on image for a larger view….
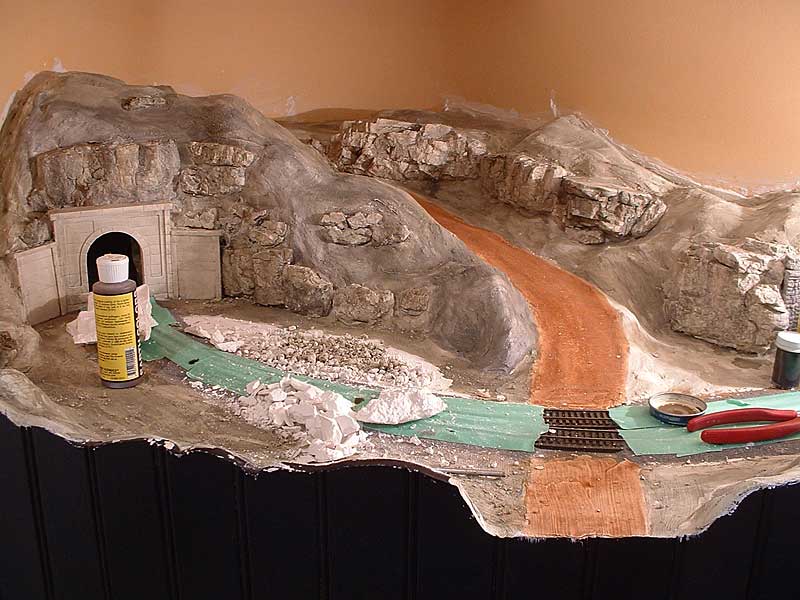
Image Copyright (c) 2006 Tim Warris
I stained the road with some reddish brown. I am not sure what I will do to the road just yet, but this is a start.
Now at this point Ron was looking at the scene and suggested I throw a light in behind the scenery to create a nice silhouette effect…
Click on image for a larger view….
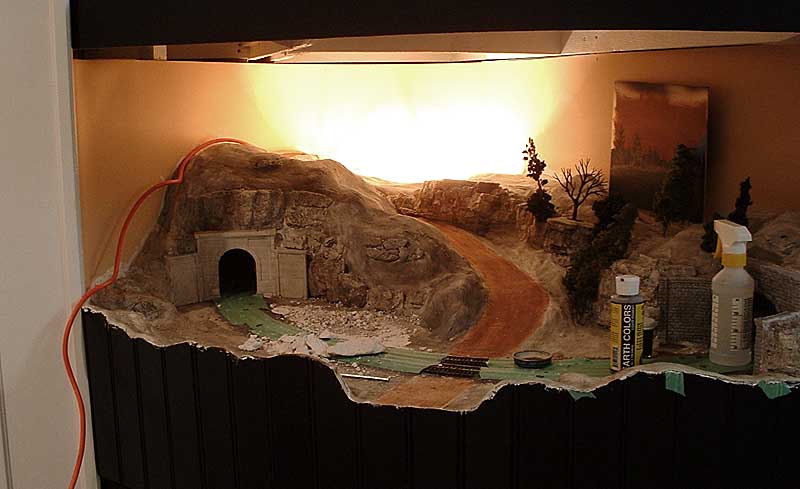
Image Copyright (c) 2006 Tim Warris
The results aren’t half bad….
I put a trouble light behind the hill, and stuck a few trees around to see how it could work. A sample of the backdrop was painted onto a small piece of wood to simulate the backdrop. The imagination is used to fill in the rest. Ignore the orange wire on the light….
Click on image for a larger view….
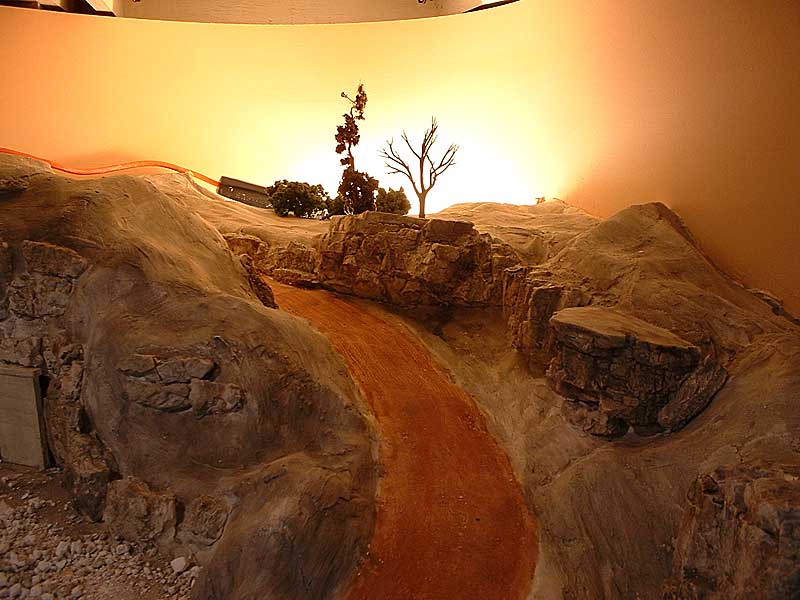
Image Copyright (c) 2006 Tim Warris
Click on image for a larger view….

Image Copyright (c) 2006 Tim Warris
I bought a yellow “bug” light bulb, the fluorescent kind that doesn’t get hot. The yellow light is much better, and really looks like a setting sun, and creates a nice silhouette on the trees.
Click on image for a larger view….
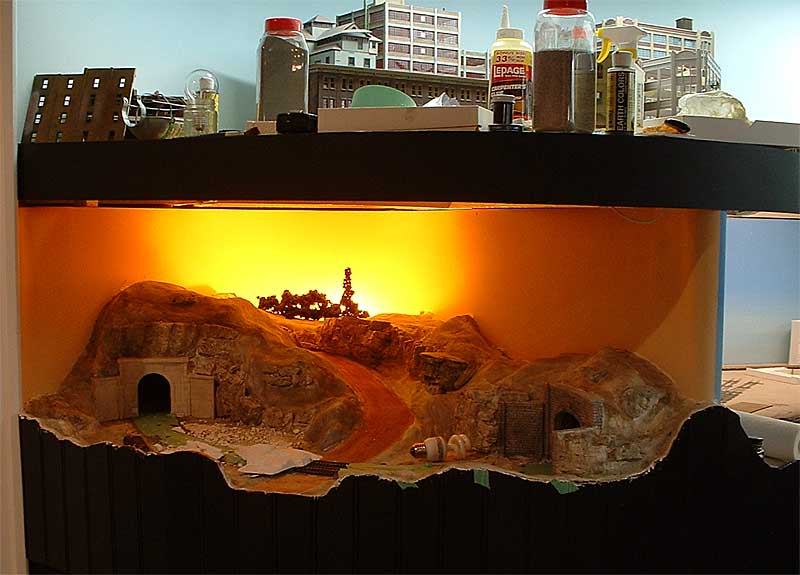
Image Copyright (c) 2006 Tim Warris
From a bit further back it is quite dramatic.
Click on image for a larger view….

Image Copyright (c) 2006 Tim Warris
With the light wired up and in place I started to paint in the backdrop. This is fairly simple as it is all silhouette. I started with a background of hills with trees painted in a muted purple. I did a search on Google for “trees silhouette” and got a few good samples of what I was looking for. After a practicing for a bit I had what I thought was a good technique for painting tree silhouettes. I used a 1/2″ wide brush and sort of “dabbed” the trees in place.
Click on image for a larger view….
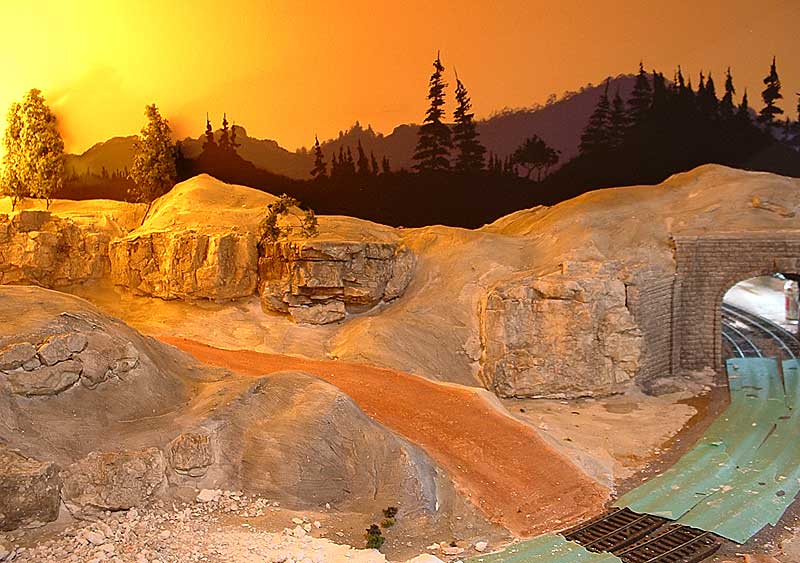
Image Copyright (c) 2006 Tim Warris
I am satisfied with how the backdrops turned out.
This is where is stands at the moment. The next step is to start putting in the ground cover and trees, which should be fun. I will post some shots as it progresses.
-Tim
Click on image for a larger view….
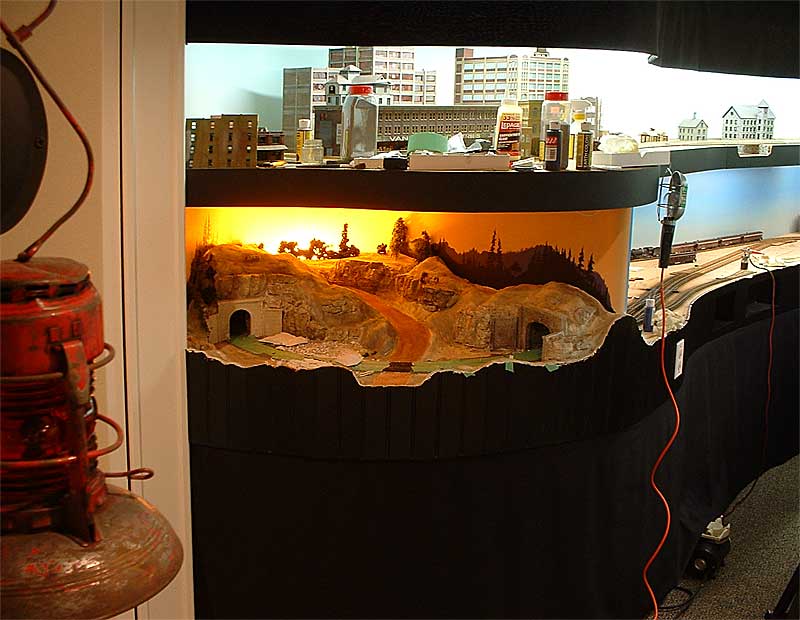
Image Copyright (c) 2006 Tim Warris
Posted by: | 01-01-2006 | 11:01 PM
Posted in: Uncategorized
Tim- you’re such an inspiring modeler- thanks for all the pleasure you’ve given me by sharing all these pics with us. I know you won’t be able to stop building something, small can be good! and manageble! Are you going to leave up the Port website so we can still enjoy it? Bart
Hi Bart,
Thanks for the comments, glad you are enjoying the site. I mentioned the move in the post, but it doesn’t necessarily mean a downsize, in fact I may end up with more room to work with.
The website will always be up, and I will keep updating it with current projects, and I don’t expect to stop modelling any time soon!
-Tim
Tim, just stopped by your site tonight since I had not been by in a while, and I see this that you are going to be tearing down. I’m disappointed, as I know many will be since your modeling is of such a high level both technically and aesthetically. But on the other hand, for someone like you it will be a clean slate, and I’m excited by the thought of how the Port Kelsey — or whatever you decide to do next, if not this — will look and how it will be designed.
How does that quote go; to everything there is a season…?
My sympathies for having to abandon such glorious work, and my encouragement to mee the new possibilities head on. I know what comes next will be every bit as exciting and attractive as what’s come before.
Craig
G’day Tim,
I’ve been all over you site, but have not found enough images of Pt Kelsey to put it all together in my mind. Could you post a few shots of the layout [upper & lower, complete &/or unfinished] before it goes.
all the best
Mark
Hi Mark,
I am hoping to draw up an “as built” trackplan before moving, will also make up a panoramic image of the entire layout.
Tim
Hi Tim:
I haven’t been able to use my computer the past few days and first thing I did when getting on it again, I took a look at Port Kelsey. It must be hard for uou to leave all this. I remember all the work you did on it. I’m hoping you will again get it to this point at your new place in the future. I hope most of it gets moved with you. If not take lots and very detailed pictures of it. I’m thinking about you and Vita every day. I’m also thinking of Ron helping too.
Love Ya MOM
Tim,
If things work out and you get a layout going again, I urge you to look at the C/MRI system. All that horrible (although very well done) wiring can go away and be replaced by a simple little computer program and interface board. You could even get some work out of Ron! My version of the yard panel had no wires other than the ones to the panel and the Tortoises. No relays and diodes. You could pay for it with the savings in wire and chiropractor fees. DCC is NOT required but is supported fully.
http://www.jlcenterprises.net/index.htm
I’m a happy customer, BTW, not affiliated in any way.
Nice work! Interesting site too….
Best wishes,
Dennis