Making faded signs on brick walls.
Sign making revisited.
I’ve done a Fast Tracks newsletter about this subject in the past, but I always felt it deserved a bit more attention, and pictures.
Click on the picture for a larger version…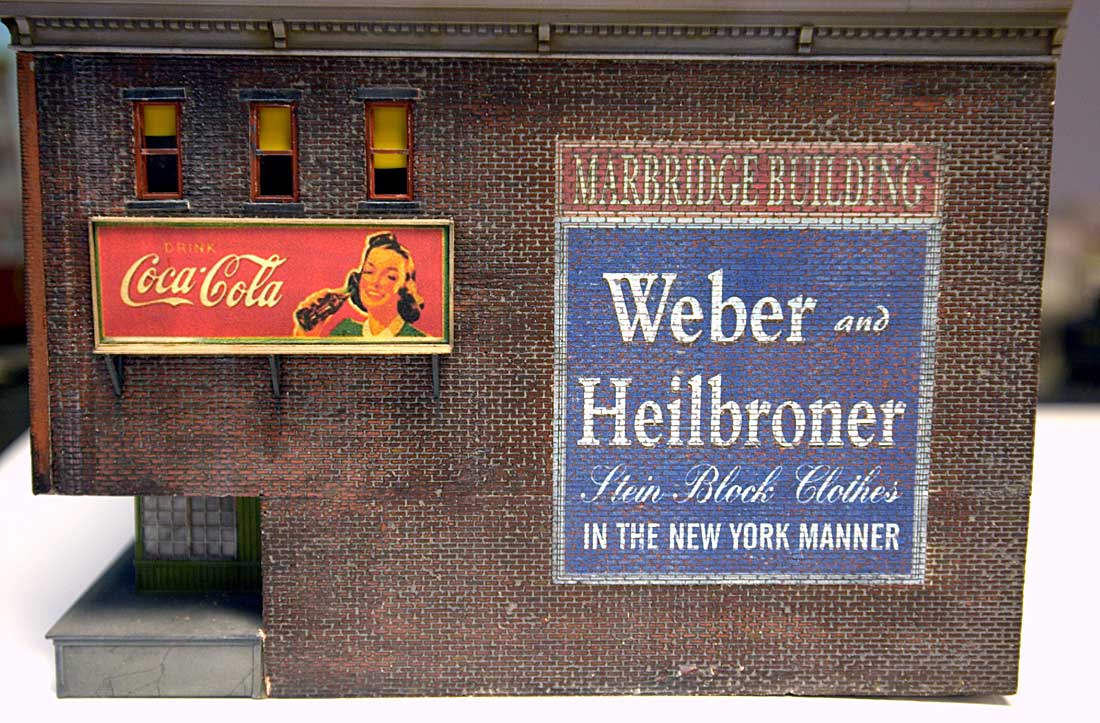
Image Copyright (c) 2006 Tim Warris
The (blue) sign on the side of this building is a bit of an illusion. It looks like a painted on, faded sign, but it is neither painted on, nor faded.
Click on the picture for a larger version…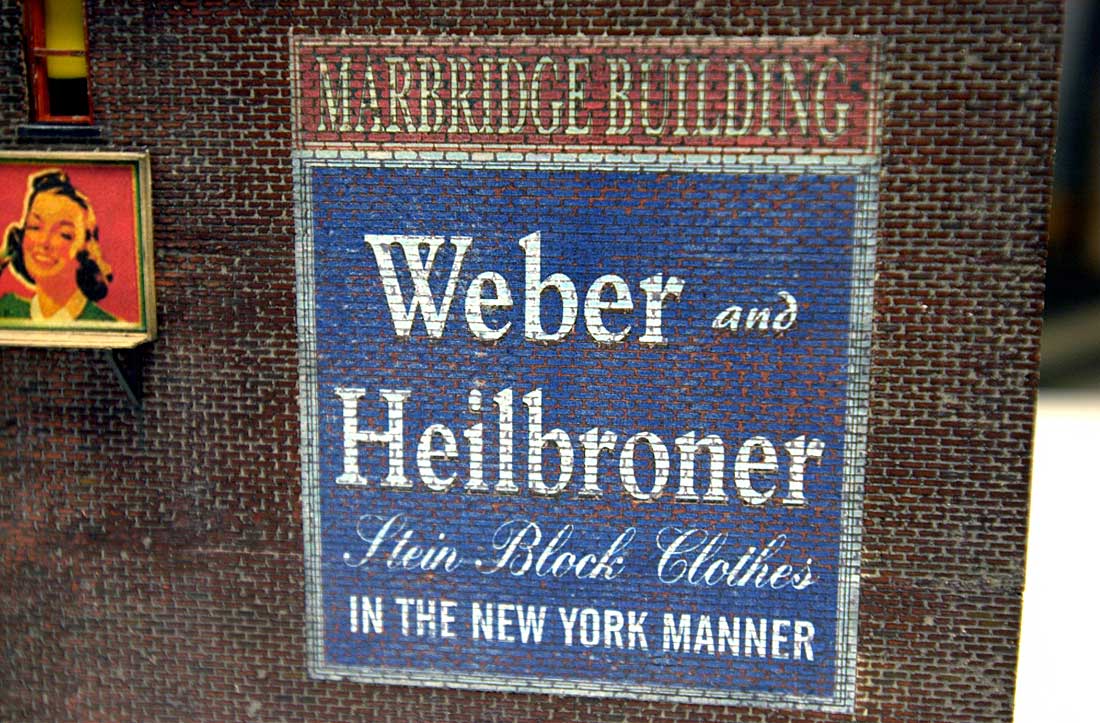
Image Copyright (c) 2006 Tim Warris
This sign was made by scanning the fully painted and weathered wall, drawing the sign in CorelDraw, combining the two images and then adding a fading effect to the sign allowing the brickwork to show through the sign.
The sign is then printed out, cut from the paper, and glued back onto the wall in exactly the same location as it was drawn in the software.
What you are seeing is not a faded sign, but a picture of a faded sign on the same wall.
I will outline how this process works with this post.
This building looks like a good candidate for a new old sign.
Click on the picture for a larger version…
Image Copyright (c) 2006 Tim Warris
This Downtown Deco building has a couple signs on it already, but I have never been too happy with them, they look good from far, but they are far from good. The Coke sign is simply glued onto the bricks and the Nehi sign is printed onto tissue paper and glued to the wall. The tissue paper method works fairly well, but could be better, I would like to see the bricks show through the sign a bit more.
I found a good sign to use on the Railroad Line forum, which has a good collection of signs.
A sign could also be drawn using CorelDraw. Both methods will work equally well for this.
The first step in this procedure, once the wall is painted and weathered to your tastes, is to scan the wall onto which the sign is to be added.
This is done by laying the entire building onto the scanner and scanning the side into Coreldraw. (Or any bitmap editing software that allows the control of “opacity” or transparency).
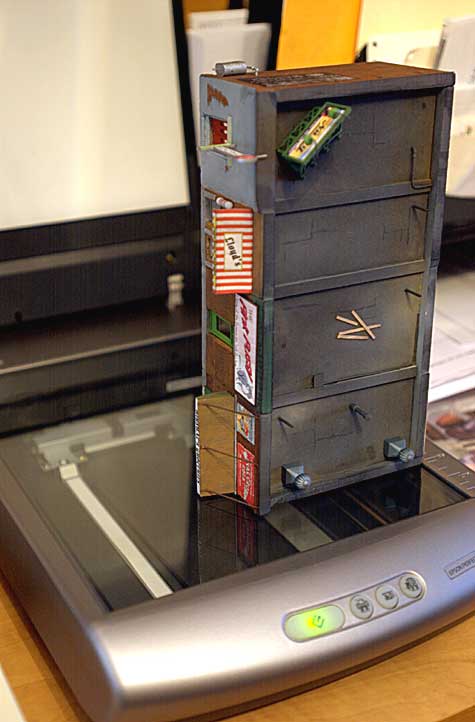
Image Copyright (c) 2006 Tim Warris
Some cropping will need to be done to isolate only the wall from the entire scanned image.
Only the area where the sign is to be added needs to be kept. Be sure it is larger than the sign. Here, I have the entire wall scanned and ready to receive the sign.
Click on the picture for a larger version…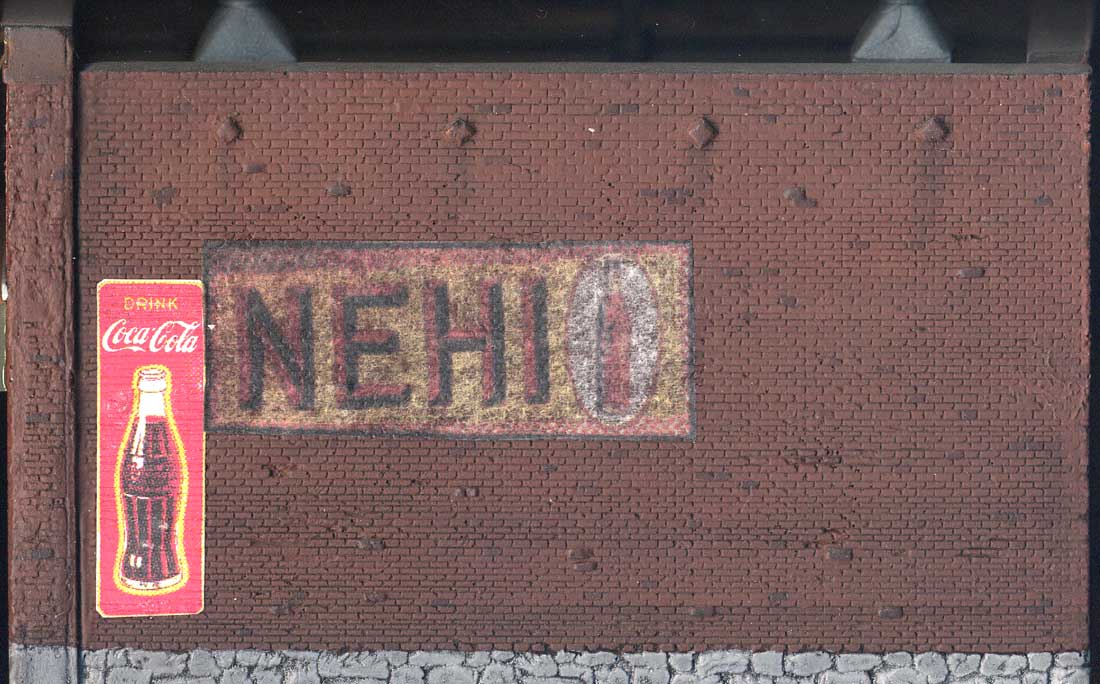
Image Copyright (c) 2006 Tim Warris
With the wall scan open, import the sign into the same page. The sign may need to be re-sized to fit the wall.
Making the sign smaller is not a problem, but be careful to not try and make the sign much larger, as a bitmap will become “pixelated” when scaled up too much.
Click on the picture for a larger version…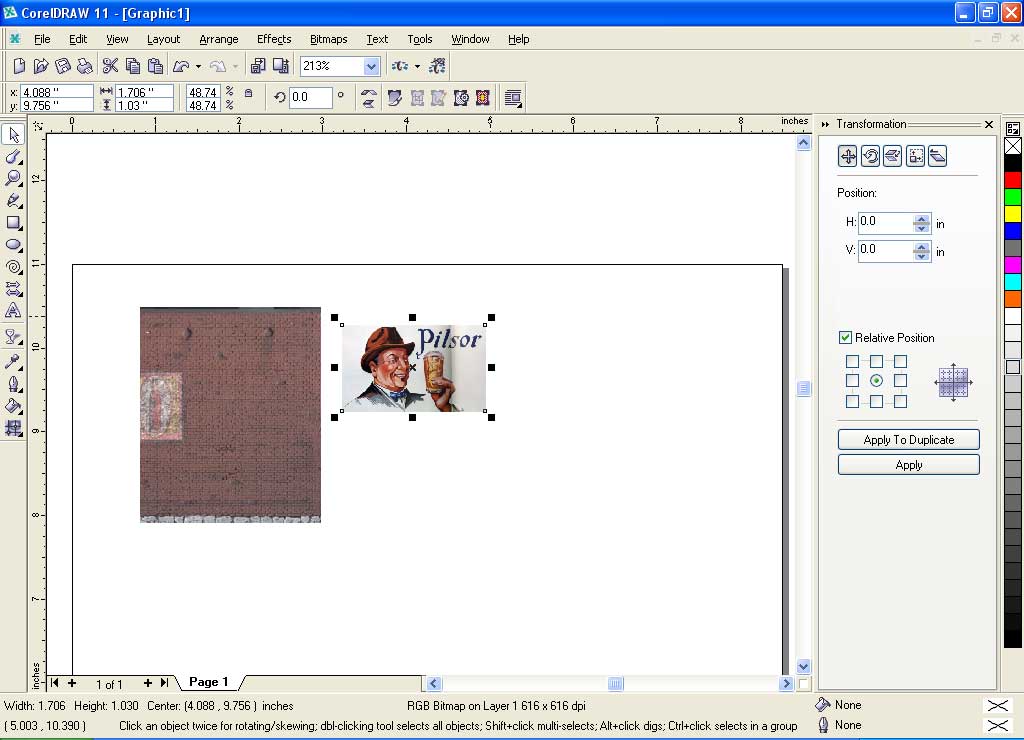
Sling Blade dvdrip Image Copyright (c) 2006 Tim Warris
Drag the sign onto the wall. If it goes in behind the wall it need to be brought up to the top layer. In Coreldraw this can be done by pressing “Ctrl PgUp”
I drew a black rectangle around the sign to help define it a bit.
Click on the picture for a larger version…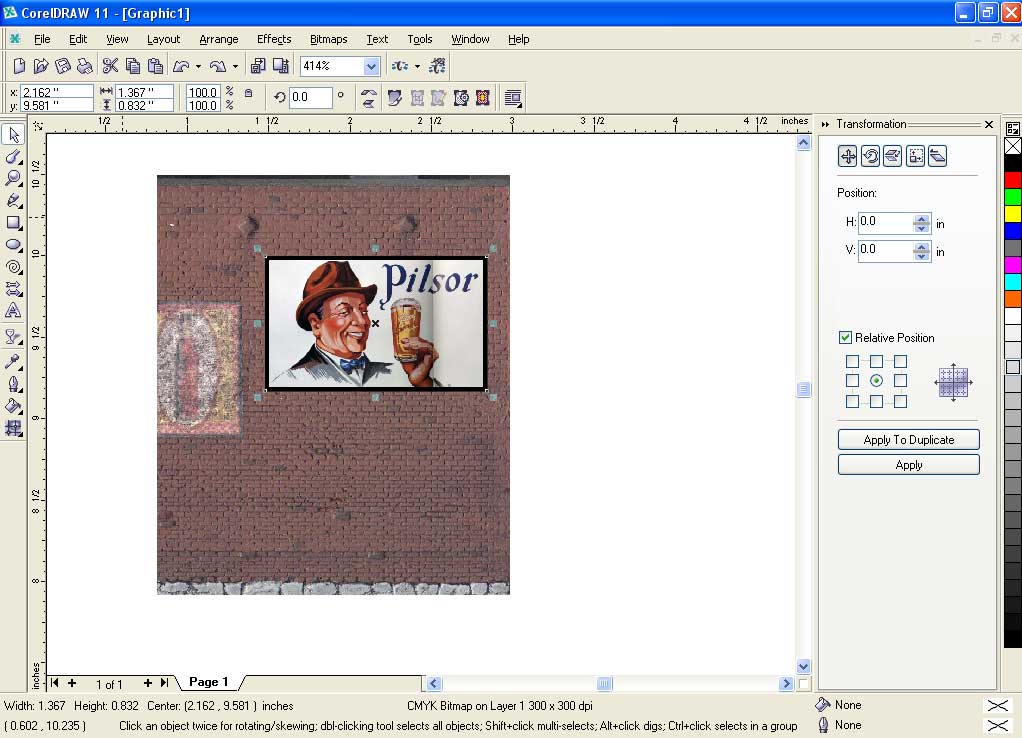
Image Copyright (c) 2006 Tim Warris
Now the neat part. With the sign selected, select the “Transparency tool” from the toolbar. Select “Uniform” from the first drop down box and move the slider to increase how transparent the sign will become. I have set it to 74% here.
This allows the image below the sign to show through by increasing how transparent the sign is. This creates a “faded” look to the sign.
Click on the picture for a larger version…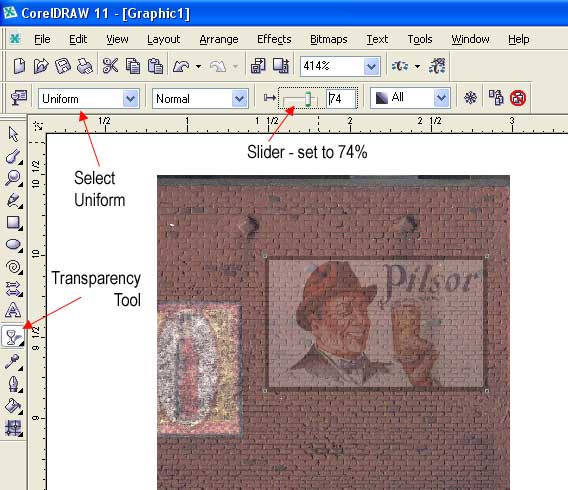
Image Copyright (c) 2006 Tim Warris
I find the sign is still a bit too clean looking, fortunately there is a tool that can take care of that.
Included in CorelDraw are several bitmap editing tools. Select Bitmaps from the top tool bar, then Art Strokes>Cubist.
Play around with the settings to create a more faded effect to the sign. The setting I used can be seen in the image below.
I used the eyedropper tool to select the “paper” color from the brickwork.
Click on the picture for a larger version…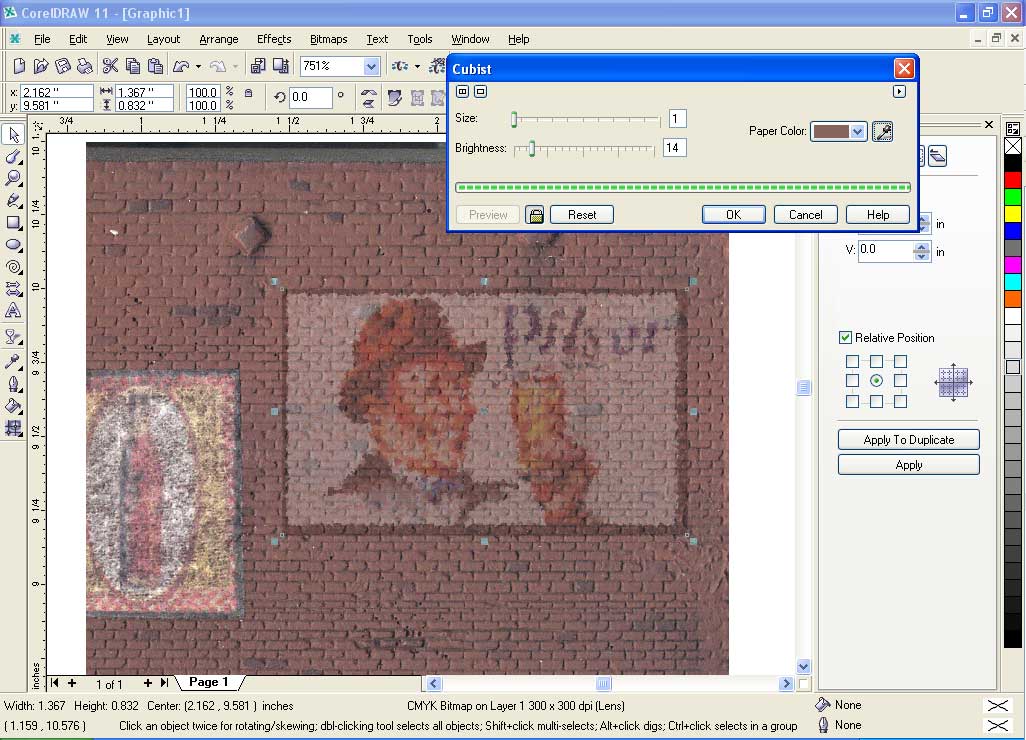
Image Copyright (c) 2006 Tim Warris
I didn’t think the sign was faded enough, so I selected the transparency tool again, and bumped up the transparency value to 82.
Click on the picture for a larger version…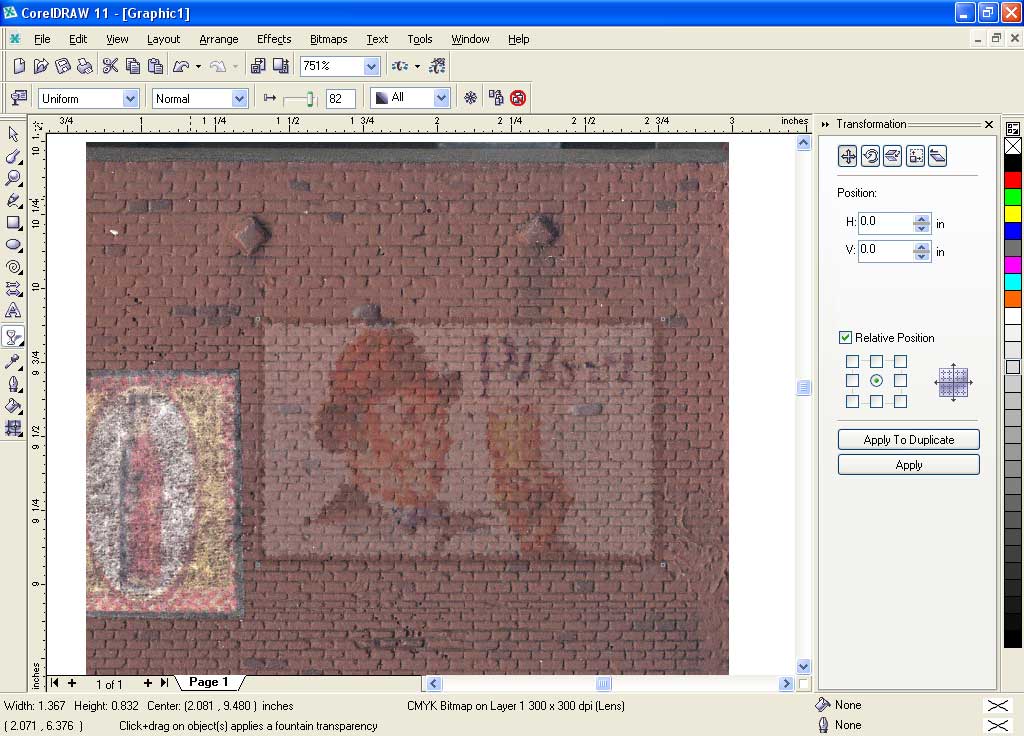
Image Copyright (c) 2006 Tim Warris
Now that the editing on the sign is complete, it has to be printed out in color. Use high quality paper, and the highest quality settings on the print.
Click on the picture for a larger version…
Image Copyright (c) 2006 Tim Warris
There will always be a bit of a color difference between the original wall and the printout. Don’t worry about that, it won’t show in the end. Trying to match a printed image to an original is almost impossible, you can drive yourself nuts trying.
Click on the picture for a larger version…
Image Copyright (c) 2006 Tim Warris
Only the sign is needed from the printout, carefully cut it out with a straight edge.
Click on the picture for a larger version…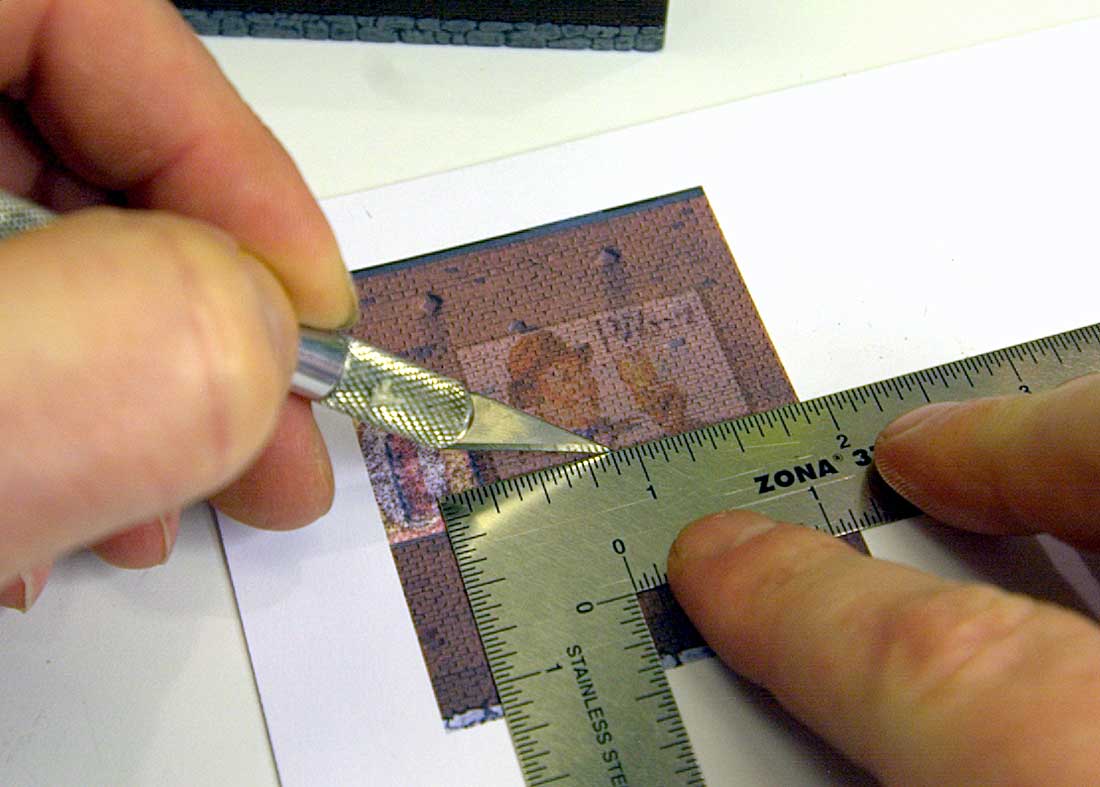
Image Copyright (c) 2006 Tim Warris
Using a emery board, sand the back of the paper, removing most of the paper, leaving only a thin layer. This is easily done, but be careful not to tear the sign. If you do, simply print out another one and try again.

Image Copyright (c) 2006 Tim Warris
The final sign is a bit on the bright side, so I dulled it down by brushing on a wash of leather dye diluted with alcohol.
Click on the picture for a larger version…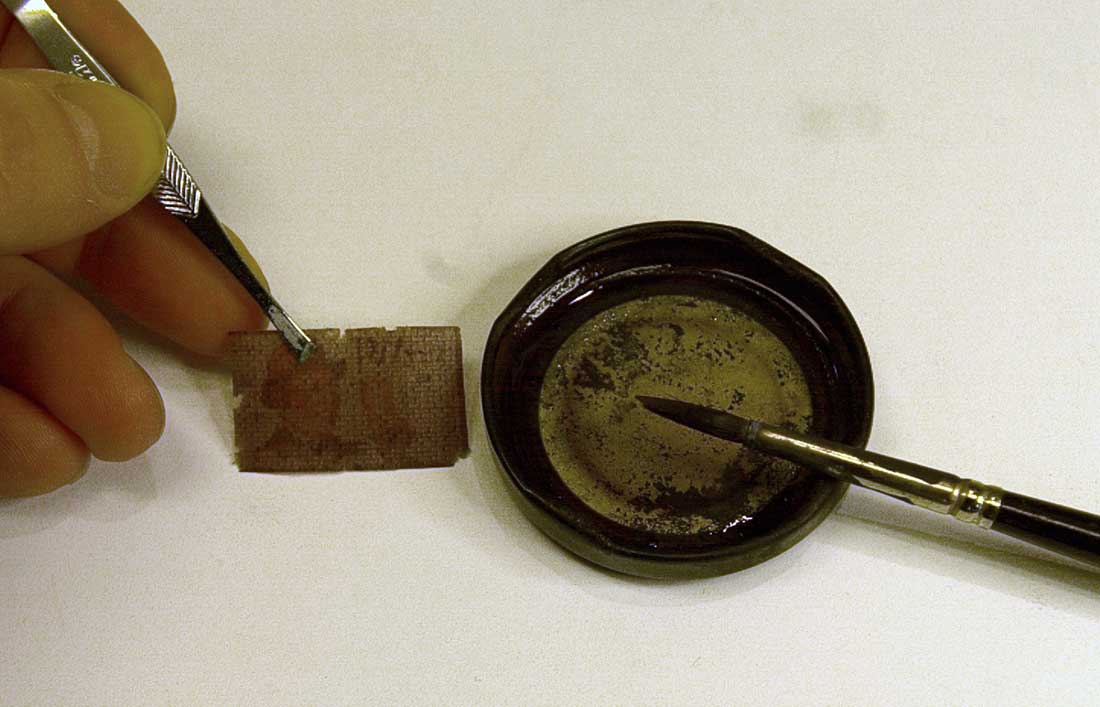
Image Copyright (c) 2006 Tim Warris
The sign is glued to the wall with ordinary carpenters glue. Spreading a layer of glue on the back of the sign will make it very pliable, and allow it to be worked into the mortar lines of the wall, creating the illusion that the sign is painted onto the wall.
Be careful not to tear the sign when applying it, as it is very delicate at this stage.
Click on the picture for a larger version…
Image Copyright (c) 2006 Tim Warris
I work the paper into the bricks with my finger nail.
Click on the picture for a larger version…
Image Copyright (c) 2006 Tim Warris
Once the sign is glued onto the building, I brush on another layer of the stain, this helps blend it all together. Adding some streaks on the wall below the sign will simulate the colors running over the years.
Click on the picture for a larger version…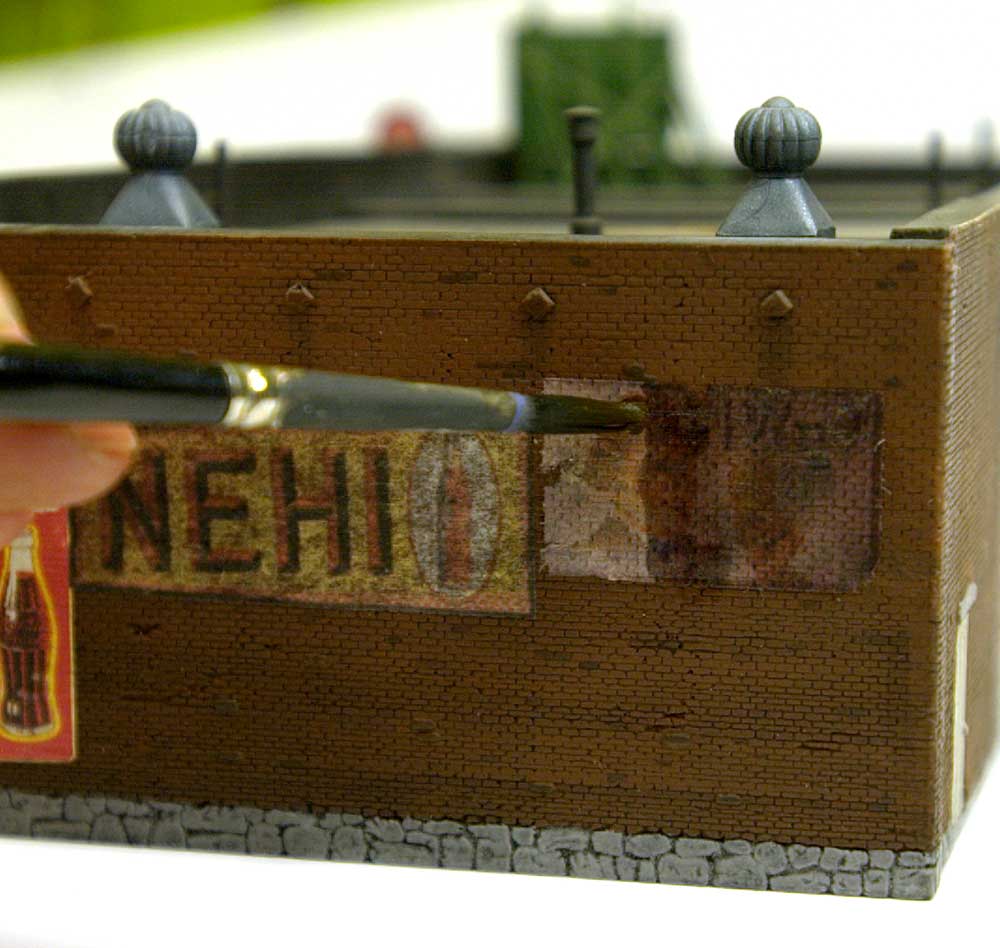
Image Copyright (c) 2006 Tim Warris
The edges of the sign show a bit in this picture, because it is such a close up shot, but from a normal viewing distance they are invisible.
The bricks show through the sign, and create a well weathered look to this ad, like it has been on the building for some time. By adjusting the amount of “transparency” in the sign, you can vary how old the sign will look.
What makes this work, is that the brickwork that is showing through the sign, is the acutal brickwork that is on the wall. Its a perfect match because it is the same wall.
Click on the picture for a larger version…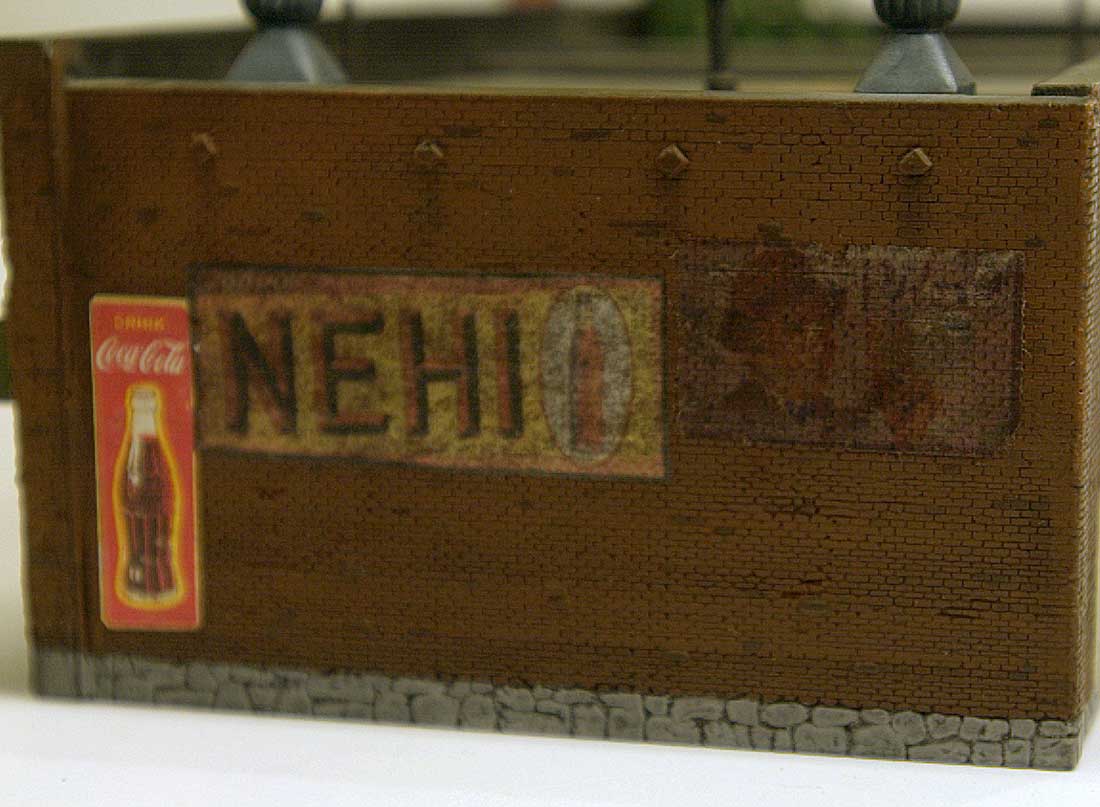
Image Copyright (c) 2006 Tim Warris
Here is a couple more signs done using the same techniques. These signs were drawn from scatch in Coreldraw, then converted to bitmaps, also in Coreldraw.
Click on the picture for a larger version…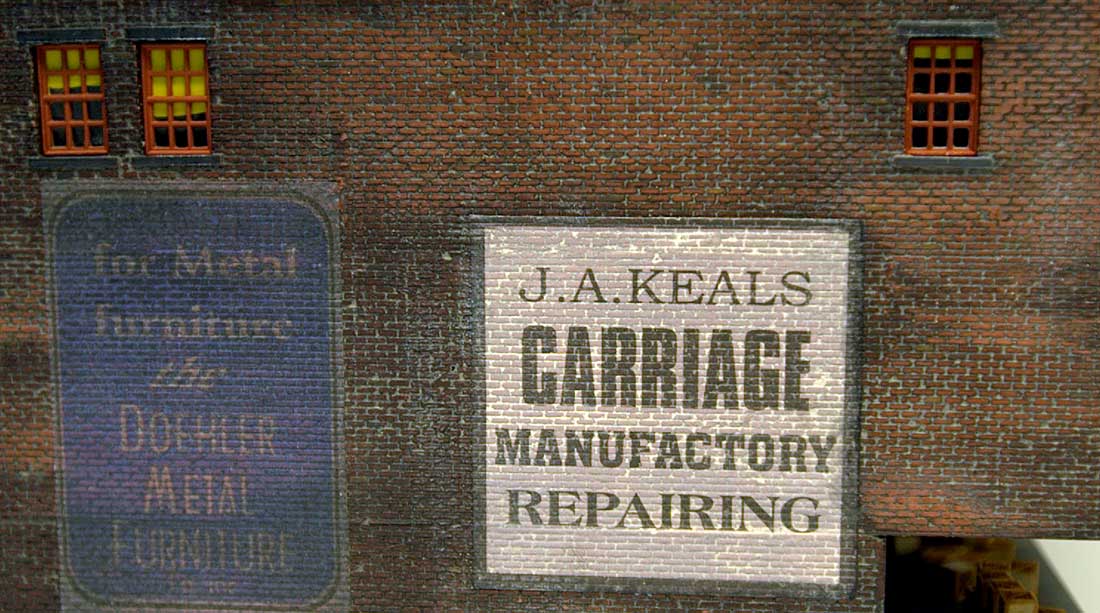
Image Copyright (c) 2006 Tim Warris
Posted by: | 02-18-2006 | 10:02 PM
Posted in: Uncategorized
Tim
Great tutorial on a very clever way of approaching a much used technique. Thanks Peter Willstein
Excellent tutorial, Tim! I’ve bookmarked it for future reference.
Tim, Far too Clever!!!
Fabulous and a great job on the Tutorial.
Thanks for sharing with the general population :o)
Stop by and see us sometime at Freerails!!
Tileguy
Tim,
That is a great little tutorial. I’m always amazed how much Computer Graphics has become an integral part of Model Railroading let alone everyones daily life.
What a great idea! Very clever indeed! I will be giving this one a try in the future.
Excellent work and a great tutorial! Exactly what I was looking for. Keep up the good work.
Kevin
Very cool tutorial. I love the “illusion”. Keep up the good work… and the good posts!
Very cool, and you didn’t use expensive decal paper!
Hello Tim,
One of my other passions is woodworking, more specifically, making and restoring 17th and 18th century reproductions. I am frequently faced with trying to match the color of an existing finish and one of my tools is wood dye, not stain; the difference being that stain is like thinned paint in that it contains pigment or solids. Dye colors the wood fibers themselves, so the grain is usually more visible than a stained surface. I have used some of the dyes with mixed results on different objects (doesn’t work on styrene), but thought that you might be interested in giving them a try. They come in a concentrated form and are soluble in water, alcohol, or mineral spirits. One of my sources is Homestead Finishing at: http://www.homesteadfinishing.com/index.html
There is a menu bar at the top and also one at the left side–click on dyeFAQs at the top or Transfast Dye Powders and/or Transtint Liquid Dye Stains on the left menu near the bottom to find out more about the dyes .
Good luck
Wayne
Just amazing stuff. It’s about time I finally had a go at signs.
Congratulations on your technique
regards
Big “M”
I’ve just started learning about train modelling, and your website is awesome!
I’m sure I’ll come back later for more brain.
Great content!Great job!
a newbie
EU/Hungary